Salesforce - Configure SSO for Mobile and Desktop Apps using SAML and OAuth
Configuring SSO for Mobile and Desktop Apps Using SAML and OAuth
Salesforce mobile and desktop clients, including the SalesforceA mobile app for administrators, can combine OAuth and SAML protocols for service provider–initiated single sign-on (SSO).
App Support for SSO
To authenticate mobile and desktop clients, a Salesforce org configured as a service provider can combine the OAuth and SAML protocols. OAuth allows users to connect applications to their accounts. SAML authenticates those connections. Using OAuth and SAML, mobile and desktop clients can take advantage of SSO integration in a way similar to web applications.
SSO integration is based on several core tenets.
- Developers are increasingly rewriting desktop and mobile applications to use OAuth to connect to user accounts. At runtime, users authenticate and authorize the app. After this initial step, a high-entropy (long, random) token is issued to the device. It is used instead of a password the next time the application is invoked. The token is unique to the user and application combination, and it is independently monitored, managed, and revoked.
- Many applications are now using web browsers to authenticate instead of native code. By using browsers, these applications can take advantage of SSO protocols written for the web. Previously, most applications were hard coded to ask users for credentials.
- Applications are separating authentication from authorization. By uncoupling these functions, an application adapts to change more easily. For instance, a client that normally prompts a user to log in using a web page from its servers can instead use SAML. It’s also easy to implement adaptive risk-based authentication techniques. These measures remove the need for other, more cumbersome security measures, such as a Salesforce API token, which is a second credential that some applications use.
- Deployment must be simple and standard. Organizations that deploy SSO want to do so once and have it work everywhere.
Combining SAML and OAuth
By layering the SAML and OAuth protocols, mobile and desktop clients perform SSO using the process shown.
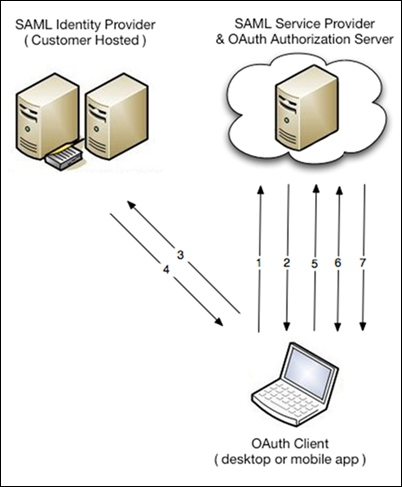
- The OAuth client makes an authorization request to the hostname you specify. Using an embedded browser, the client asks the service provider for authorization. It does so using a custom URL that is your My Domain subdomain.
- The authorization server detects that the client must authenticate and redirects the user to the SAML identity provider (IdP). The URL for the authorization server is passed via the RelayState parameter.
- The user accesses the IdP, and the IdP performs authentication.
- After the user is authenticated, the IdP sends back a SAML response. The browser transmits a response with a RelayState parameter. The response indicates that the client app is returning to the OAuth authorization server.
- Salesforce processes the SAML assertion and logs the user in. The digital signature applied to the SAML response verifies that the message is from your system. At this point, Salesforce authenticates the user and redirects them to the authorization server.
- After authentication, the client prompts the user to allow the client to connect to their account. The prompt is a simple web page that shows the user information about the client and what it’s requesting.
- If the user approves the application, it is issued a high-entropy token that the application uses to establish a session. Subsequent application use does not require the user to reenter credentials.
When layered with SAML, OAuth is much like any other bookmark or deep link. No additional development or deployment steps are necessary to enable SSO for the client app.
Configure Service Provider–Initiated SSO
Mobile or desktop apps that layer the SAML and OAuth protocols require two configuration steps.
- Use the My Domain wizard to set up a subdomain. Deploying a subdomain improves the user experience and allows users to access deep links. This step is an easy way to prepare your org for service provider–initiated SSO from a mobile app or desktop client.
- Point the client at the host that your subdomain represents. This step involves defining a new host connection in the app’s settings.
Let’s look at some examples that configure mobile and desktop clients for service provider–initiated SSO.
Various Salesforce and ISV applications support SSO using layered SAML and OAuth protocols. Because the combined protocol approach relies on open standards and public APIs, you can also use it for custom app development. If you are a developer that wants to take this approach and follow best practices, see Advice for Application Developers.
Salesforce for iOS or Android
The Salesforce mobile app works only with a Salesforce org configured for service provider–initiated SSO.
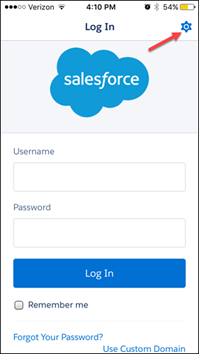
To set up Salesforce on either an iOS or Android device, configure your My Domain URL under the app’s connection settings.
- For example, on iOS, launch the app. At the top right of the Log In page, tap the gear icon.
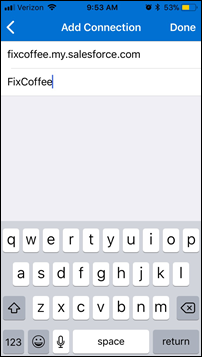
- To add a login connection, tap the + icon.
- Enter the My Domain subdomain for your Salesforce org. Don’t include https:// in the URL. To save the new connection, tap Done.
- Select the connection you created, which redirects you to your org.
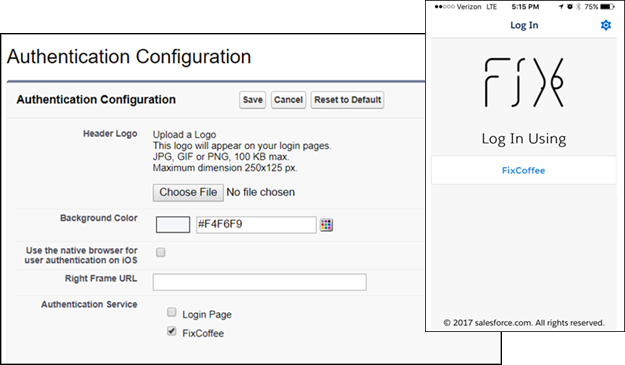
- The login page appears. The login options depend on how you configured authentication services on your My Domain page. In this example, the login page is customized. The standard login authentication service is disabled, and the FixCoffee authentication service for the sample org is activated.
- Enter your credentials, and log in to Salesforce.
SalesforceA for iOS
- Launch the application, and tap Sign In.
- Configure your My Domain subdomain as a new connection under the app’s connection settings. To add a connection, tap the gear icon in the top right, and then the + icon.
- Enter the My Domain subdomain for your Salesforce org. Don’t include https:// in the URL. To save the new connection, tap Done.
SalesforceA for Android
To set up SalesforceA on an Android device, configure a new connection that points to your subdomain.
- Launch the SalesforceA app, and access the menu.
- Tap Change Server, and then tap Add Connection.
- Enter the My Domain subdomain, including https://. To apply the URL to the connection, tap Apply.
- Choose the new connection, and tap Apply.
Desktop Clients
Several desktop clients, including Chatter Desktop, Salesforce for Outlook, and Data Loader, also layer the SAML and OAuth protocols. It’s easy to configure these desktop apps for service provider–initiated SSO using a similar process.
- Enable and deploy a My Domain subdomain in your Salesforce org.
- Configure a new connection in the desktop client that points to your My Domain subdomain.
For example, to configure Data Loader as a desktop client, click Use Custom Domain on the login page. Enter the My Domain subdomain.
Advice for Deploying Applications
When deploying SSO for devices, consider the following best practices.
- Confirm that service provider–initiated SSO is working properly. Verify SSO using a desktop browser before trying it on a mobile device. Some deployments have difficulty properly propagating the RelayState parameter through the SAML request and response sequence. Verify that the IdP endpoints are correct, the RelayState’s URL encoding is maintained, and the value sent to the IdP is echoed back to Salesforce.
- Clearly communicate your My Domain URL to users and provide client-specific instructions. Users bear the responsibility of properly configuring apps to point to the right URL. Make sure that you educate users on the proper configuration steps.
- Consider the impact of IP restrictions on mobile devices. VPN and BES servers often help to alleviate issues. To circumvent IP restrictions, some mobile clients send activation emails.
- Assess the design of your identity provider’s login page. Both the size and performance of mobile client pages can impact a user’s experience. While Salesforce login services can dynamically adapt to various devices, when hosting your own identity provider, consider the size and loading speed of your login page. Consider implementing user agents that detect less-capable devices, and tailor or simplify authentication interfaces. This precaution is especially important when authenticating users on older device types.

Advice for Application Developers
When building OAuth-enabled applications, consider these best practices.
- Allow users to specify their My Domain URL. When deploying an application, it’s important that users can specify the login service for authentication. Best practice is to allow a user to choose between production, sandbox (or test), and custom orgs. To use SSO, users must be able to specify a custom host connection. Also, consider techniques that simplify configuration, such as allowing an enterprise IT group to centrally manage user configurations.
- Consider the size of the login window. Given the wide variety of identity providers, it is difficult to predict the look and feel of the page presented when users log in using SAML. While some platforms, such as Android and iOS, can gracefully adapt to different page sizes, other platforms are less flexible. In these cases, consider using a reasonably large authentication interface, or allow the user to resize or scroll the interface.
Delegated Authentication
Another option to authenticate users on mobile and desktop devices is delegated authentication. If enabled for an org and in user profiles, when a user authenticates directly to Salesforce, credentials are sent back to a customized endpoint over HTTPS.
Salesforce uses this process for delegated authentication.
- When a user tries to log in, Salesforce validates the username and checks the user’s profile settings.
- If the profile has the Is Single Sign-On Enabled user permission, Salesforce does not validate the username and password. Instead, a web service call is made to the org, asking it to validate the username and password.
- The web service call passes the username, password, and IP address to a web service that you host.
- Your implementation of the web service validates the information and returns either true or false. If the response is true, the login process continues, a new session is generated, and the user proceeds to the application. If the web service returns false, the user is informed that the username and password combination is invalid.
This process allows existing authentication systems to validate credentials, and it works with all mobile and desktop clients. After a delegated authentication service is built and enabled for a user, no additional configuration is required. The user can log in using the regular Salesforce login page, but your web service validates credentials.
Adapt Existing Delegated Authentication-Based SSO
Historically, many Salesforce customers have implemented SSO on top of delegated authentication, which follows this process.
- Users start at an SSO page, perhaps on their corporate intranet.
- Users log in locally to their own authentication system.
- The SSO page generates a cryptographic token.
- The Salesforce username and token are posted to the Salesforce login page. In addition, a startURL parameter is often included to indicate the user’s starting page.
- If the user profile has the Uses Single Sign-on permission enabled, Salesforce makes a web service call to a custom SSO service. Salesforce asks the service to validate the username and token.
- The service validates the cryptographic token and returns either true or false. If the response is true, the login process continues, a new session is generated, and the user proceeds to the application.
SAML, an industry standard, has superseded delegated authentication. By using a SAML approach, companies can establish effective and standards-based SSO implementations.
If you have an existing SSO deployment using delegated authentication, you can apply the following technique with mobile or desktop clients. While delegated authentication deployments do not use SAML, they can be adapted to take advantage of these capabilities by using part of the SAML protocol. This change requires small adjustments to the code in your SSO service.
- Configure My Domain and SAML for your org. You can configure dummy values for the SAML settings for everything except the Identity Provider Login URL. This setting must be a URL that receives the SAML authentication request from Salesforce, but it doesn’t need to actually process the request.
- A user requests a resource in the org, for example, https://customer.my.salesforce.com/001/o.
- Salesforce notices that the user does not have a session for that org and sends a SAML authentication request to the org’s SSO service. The request includes the RelayState parameter, for example, /001/o.
- The SSO service receives both the SAMLRequest and RelayState parameters via an HTTP POST operation. The service ignores the SAMLRequest, but picks up the RelayState.
- The SSO service authenticates the user and generates a cryptographic token.
- The Salesforce username and token are posted to the Salesforce login page. In addition, a startURL parameter is echoed back with the value from the RelayState parameter.
- If the user’s profile has the Uses Single Sign-on permission enabled, Salesforce makes a web service call to the SSO service, asking it to validate the username and token.
- The service validates the cryptographic token and returns either true or false. If the response is true, the login process continues, a new session is generated, and the user proceeds to the requested page.
To summarize, Salesforce sends the user request over SAML, but the request is sent back using delegated authentication. The RelayState parameter is transformed into the startURL parameter to redirect the user to the correct page. Using this technique, mobile and desktop clients that use SAML with Salesforce can also take advantage of SSO over delegated authentication.


I really enjoy the blog.Much thanks again. Really Great salesforce online training Hyderabad
ReplyDeleteThis comment has been removed by the author.
ReplyDelete