How to login to AWS EC2 instance
This post goes over the key steps to login to your EC2 virtual machines hosted in the AWS (Amazon Web Services).
There are two ways to connect to the remote machine (the EC2 virtual machine) which is hosted on the Amazon cloud
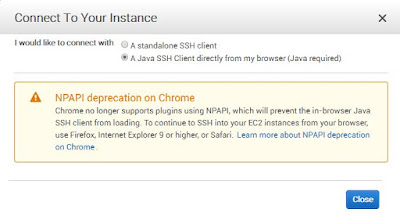
(1) either connect via a standalone SSH client or use a Java SSH client directly from your browser.
(2) or use putty client (putty is SSH client, provided by https://www.putty.org, that can downloaded from https://www.chiark.greenend.org.uk/~sgtatham/putty/latest.html Scroll down to the Binary files and pick your appropriate version. For 64-bit x86 version the download is here https://the.earth.li/~sgtatham/putty/latest/w64/putty.exe
(2) or use putty client (putty is SSH client, provided by https://www.putty.org, that can downloaded from https://www.chiark.greenend.org.uk/~sgtatham/putty/latest.html Scroll down to the Binary files and pick your appropriate version. For 64-bit x86 version the download is here https://the.earth.li/~sgtatham/putty/latest/w64/putty.exe
If you want to connect with your browser then only IE and Firefox are supported. See note below regarding Chrome browser.
Since Chrome browser does not support plugins using NPAPI, you cannot use the in-browser Java SSH client (NPAPI deprecation on Chrome). You need to use Internet Explorer or Firefox browser in order to, Connect to your EC2 linux instance using the in-browser Java SSH client.
Steps using putty client.
Steps using putty client.
Here are the detailed steps for logging into your linux machine hosted in Amazon cloud using putty
(a) First Login to EC2 console and start your machine (via the EC2 web based administration console).
Once machine is started you will see its public dns hostname as below (screenshot shows status of your EC2 instances. The below EC2 instance is running and its public hostname is on the right side, under Public DNS IPv4)
Once machine is started you will see its public dns hostname as below (screenshot shows status of your EC2 instances. The below EC2 instance is running and its public hostname is on the right side, under Public DNS IPv4)
(b) Now launch your local putty client to connect to this host, after you verify that the status of your instance is "running". You will need to do 2 things on the putty configuration as shown in screenshot,
(i) one enter the hostname, and under menu on left hand side
(ii) click SSH (on the left side menu), and then Auth. Click Browse button (on the right side), this will give you option to browse/choose your .ppk file. See below screenshot [What is ppk file? ppk file is the private key that you will use to connect with your putty client. Note: you should have already generate the ppk file when creating a new ec2 linux virtual machine. During creation of a new linux host in EC2, one of the step generates ppm file. However, this .pem file needs to be converted to ppk format. Here are the details and how-to provided by AWS. Use the puttygen tool/utility to conver the .pem to .ppk format ]
The Host Name (shown above) was entered as given from earlier screenshot from EC2 console (its Public DNS name).
Below screenshot shows where to enter the location of .ppk file
After clicking Browse, go/select your ppk file, for example, it shows the ppk file (myaws.ppk) is under C:\users directory. This ppk file will be used for authentication. The ppk file is the private key for authentication during login process. Make sure you have already converted the .pem file to .ppk file using the puttygen tool. When you are saving the .ppk file as an added security measure you will be asked to choose a passphrase. When you connect using the .ppk file you will be asked to enter your passphrase also.
After connecting with AWS Linux machine you will be prompted to login as shown below.
Use username as ec2-user and you should be logged in successfully. There will be no need to enter password since you provided the ppk file for authentication purpose.
Note: If you instance type is ubuntu (operating system) then username will be ubuntu. (Note the different username if host is Ubuntu linux).
Note: If you instance type is ubuntu (operating system) then username will be ubuntu. (Note the different username if host is Ubuntu linux).
See below after successful login as ec2-user you should see the welcome message, depending upon the machine you have chosen. In my case it was a Amazon Linux AMI machine.
For details, refer to the AWS documentation.
For Windows based virtual machine, you will require a RDP client to connect.


This comment has been removed by the author.
ReplyDeleteIt was a great information. Thanks for sharing.
ReplyDeleteAWS Training
Wow it is really wonderful and awesome thus it is very much useful for me to understand many concepts and helped me a lot. it is really explainable very well and i got more information from your blog.
ReplyDeleteAWS Online Training
AWS Certification Training
AWS Certification Course Online
AWS Online Course
Thanks for posting such useful information. You have done a great job.
ReplyDeleteAWS Training
AWS Online Training
Amazon Web Services Online Training
AWS Training in Hyderabad
AWS Training in Ameerpet
This post is so usefull and informative.Keep updating with more information...
ReplyDeleteBenefits Of AWS
Advantages Of AWS
AWS course
ReplyDeleteOnline AWS course
Amazon Web Services (AWS) Athena is a serverless, interactive query service that enables users to analyze data stored in Amazon S3 using SQL. It allows you to query structured, semi-structured, and unstructured data using standard SQL, making it a powerful tool for data analysts and data scientists. For more information, visit us at SAP analytics consulting or call us @ 1-289-952-8845.
ReplyDelete